How Does HTML Microdata Help With Accessibility?

I've been studying HTML from an accessibility blog written by a blind developer. I was curious how they structured their markup and wanted to see if there were any extra bits that made it even more accessible.
The markup from this particular blog seemed to go above and beyond what I'd call basic semantic structure; article, header, logically ordered headings, etc. It also featured some attributes I've recognized from before (item-something?) but I never took the time to learn about: Microdata.
Article continues after ad
What is Microdata?
Microdata, as described from schema.org and/or the Microdata spec, are attributes to help browsers build out a machine-readable data structure for browsers to consume. It can be thought of as key:value pairs much like a JSON object.
After reading the spec and reviewing some examples, there seems to be three main attributes to be aware of:
- Anything with the
itemscopeboolean attribute is the item, or "thing" of data you're defining. It's more or less a container or "starting point" of data. - An item needs the
itemtypeattribute with a specific URL value to further describe the vocabulary or "category" of the thing. In other words, what is acceptable as child items of data. - One last attribute to include in the definition of an item is
itemprop. This is the property name of the data node we're currently defining.
Here's the kicker:
Microdata helps to locate and arrange content for browser Reader Mode.
What is Reader Mode?

Reader Mode is a browser feature that makes it easier for someone to focus on content by:
- hiding non-essential page elements like navigation, sidebars, footers, and ads
- changing the page's text size, contrast and layout for better readability
- removing distracting animations
This helps with creating a more accessible experience for people with cognitive impairments or learning disabilities, such as Dyslexia, as it strips away everything that's unnecessary on the page.
Adding Microdata to a blog post template
Let's write some HTML for a blog post template and add in the Microdata attributes which help in creating a better Reader Mode experience.
1. Article container
For the article container element, let's add couple attributes as described above.
<article itemscope itemtype="http://schema.org/BlogPosting">
  <!-- … -->
</article>
Adding the itemscope and itemtype attributes will create the initial data structure for the browser to consume. Settings its type as "BlogPosting" will allow for a specific set of children data to be added.
2. Header and meta content
Next we'll add the header element along with the blog post meta data. This will include information such as the title, byline, date published, and author. Since this is a full blog post landing page, we'll use an h1 for its title text.
<article itemscope itemtype="http://schema.org/BlogPosting">

  <header>
    <h1 itemprop="headline">My Blog Post Title</h1>
    <p itemprop="description">A little extra on what this post is about</p>
    <ul>
      <li>
        Written by
        <span itemprop="author" itemscope itemtype="http://schema.org/Person">
          <span itemprop="name">Scott</span>
        </span>
      </li>
      <li>
        <time datetime="2020-01-09" itemprop="dateCreated pubdate datePublished">
          January 9th, 2020
        </time>
      </li>
    </ul>
  </header>

  <!-- … -->
</article>
There's a lot of content here, so let's break it down.
- The
h1element received theitemprop="headline"attribute, declaring this as the post title. - The byline content container has the
itemprop="description"attribute, which declares this content as the post description. -
Author data requires its own data type of "Person". Since we need to declare a new
itemtypeattribute, we also includeitemscopeto begin a new node for the data structure. This data needs to be set in its own HTML element, wrapping the related content. Sincespanis an inline element and features no semantic meaning, this is a safe element to use.The author's name is then wrapped with another
spanwith itsitempropattribute set toname. -
Lastly, the date of the blog post uses the semantic
dateelement which features theitemprop="dateCreated pubdate datePublished"attribute to set the date of the post.
3. Content body
The last pieces to add are the (optional) post image and content body.
<article itemscope itemtype="http://schema.org/BlogPosting">

  <header>
    <!-- … -->
  </header>

  <img src="article-image.jpg" alt="" itemprop="image" />

  <div itemprop="articleBody">
    <p>
      Lorem ipsum dolor sit ame, consectetur adipiscing elit. Donec a quam rhoncus, tincidunt ipsum non, ultricies augue…
    </p>
    <!-- … -->
  </div>

</article>
With the itemprop="articleBody" attribute applied to the wrapper div element, our data structure knows this is the primary text content of the post.
The itemprop="image" applied to the img element sets this as the main post image.
Altogether now!
Here's the final HTML snippet with all the Microdata attributes added:
<article itemscope itemtype="http://schema.org/BlogPosting">

  <header>
    <h1 itemprop="headline">My Blog Post Title</h1>
    <p itemprop="description">A little extra on what this post is about</p>
    <ul>
      <li>
        Written by
        <span itemprop="author" itemscope itemtype="http://schema.org/Person">
          <span itemprop="name">Scott</span>
        </span>
      </li>
      <li>
        <time datetime="2020-01-09" itemprop="dateCreated pubdate datePublished">
          January 9th, 2020
        </time>
      </li>
    </ul>
  </header>

  <img src="article-image.jpg" alt="" itemprop="image" />

  <div itemprop="articleBody">
    <p>
      Lorem ipsum dolor sit ame, consectetur adipiscing elit. Donec a quam rhoncus, tincidunt ipsum non, ultricies augue…
    </p>
    <!-- … -->
  </div>

</article>
Try it out in my Microdata example CodePen.
Article continues after ad
Test Microdata implementation
If you're adding Microdata attributes to your templates, check out Google's Structured Data Testing Tool. You can add a URL or source code directly and the tool will report errors and warnings to your structure.
In testing the above HTML snippet, this tool reported some missing data which was required for the BlogPosting type. Here's what I added to satisfy these errors:
<div itemscope itemprop="publisher" itemtype="http://schema.org/Organization">
  <meta itemprop="name" content="Company Name">
  <span itemprop="logo" itemscope itemtype="http://schema.org/ImageObject">
    <meta itemprop="url" content="logo.jpg">
  </span>
</div>
Since this content is only for data structure we can use the HTML meta element. This remains as valid HTML as long as only the itemprop and content attributes are included.
You could accomplish the same thing by setting CSS display: none on a wrapper span element, but this has negative side effects when it comes to SEO and other data structure related issues.
Reader Mode comparison
Here's why I feel these extra attributes are worth adding. Review these before and after images from Safari Reader Mode:
Before
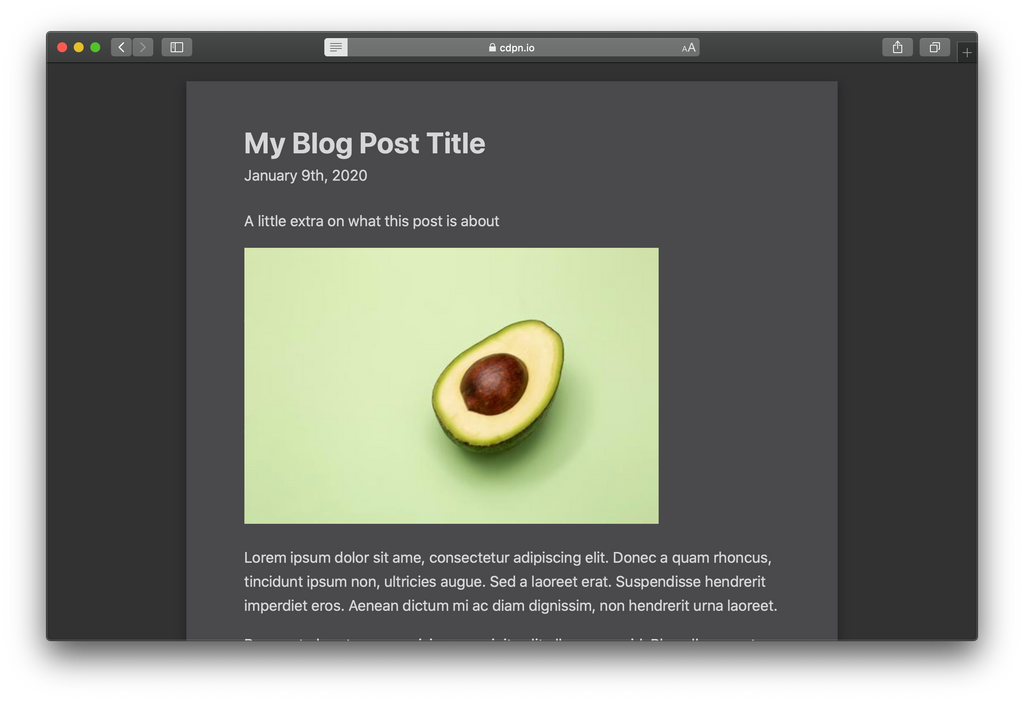
After

Here are the main differences with Microdata applied:
- Byline is moved up directly below the title with slightly larger text.
- Author and date are formatted on the same line, separated by a bullet character.
- The author is displayed! (Not sure why it would be hidden before. 🤔)
- The image is center aligned.
Conclusion
By including Microdata attributes the Reader Mode layout now provides extra visual affordance. These visuals help in communicating structure and purpose of the content.
When applied to the template, Reader Mode will provide a consistent visual style, helping people consume content with accuracy and ease.
And really, this is what we as designers and developers of the web should be striving for; focusing on ease of use and creating a comfortable experience for all readers of our content.